Power BI: Save time with MQuery Calendar
- Soo Reed

- Jul 6, 2021
- 7 min read
Updated: Oct 3, 2022
Faster Power BI development with MQuery Calendar
Developing amazing Power BI requires you to use a separate calendar table; it will give the flexibility and the options you need manipulating the date. Have you noticed how tedious and repetitive it is to create a calendar using either CALENDAR() or CALENDARAUTO() and create all the often used columns each time? What about the time you created a complex calculated column or a nice calendar table with multiple columns you use often and you want to use it every time you create a new report? This is when the MQuery Calendar comes in.
What is this MQuery Calendar?
When developing Power BI, you noticed the [Transform] stage when adding new data. All the transformation in that stage is using M language, not DAX. Now, you can create a table (i.e. calendar table) and all the necessary columns here, and then save the MQuery code. This way, every time you create a new Power BI report, you can paste the code and you will have the calendar set up for you immediately.
But I don’t know the M language….
It’s ok! You don’t need to be familiar with MQuery to create your own calendar. You probably already have used [Transform] for something, like column name change, data format change, etc. That [Transform] is the UI that helps you write MQuery, and you can create your own calendar without mastering M language. Once you change column names and data format, do you want to see how it was interpreted to M language? After the change, click [Advanced Editor] in the Query section.
What if I don’t want to create my own MQuery Calendar?
If you don’t want to create your own MQuery Calendar, then you can easily find other people’s MQuery Calendar online! As a starter, you can use the code at the end of this blog here. Otherwise, google “MQuery Calendar” and you will see many options come up. Here’s one site that lets you download the calendar as an example: accessanalytics.com.
You can also support me by purchasing my favorite M Query Calendar code here at Gumroad — Power BI Time Saver: M Query Calendar for suggested donation $1.49. It will have two M Query Calendar codes for different week calculations (Sunday start vs. Monday start) along with a how-to guide. In addition to what this blog covers, it will also have monthly comparison for week-day analysis covered in this blog: “Visualizing Monthly Seasonality“.
Download the MQuery code, and follow the instruction on the section of “Load the calendar” at the end.
How to Create Your Own MQuery Calendar
For those who want to learn how to create your own mquery calendar. There are 3 steps: creating a base data table, adding columns you want, and then save the code.
Blank Query > Advanced Editor

Let’s create a blank query by clicking [Get data] > [Blank Query]. If you are already in the [Transform] section, you can also create a blank query by clicking [New Source] > [Blank Query].
Then open [Advanced Editor].

List.Dates()
To create a calendar, we will first create a list of dates using this function List.Dates(). his function takes the following arguments: List.Dates(start as date, count as number, step as duration)
In Microsoft doc, it shows the example: List.Dates(#date(2011, 12, 31), 5, #duration(1, 0, 0, 0))
— this means, start on 2011/12/31, give me 5 dates that are 1 day apart from each other. It will give the following result:

So you can put whatever start date you want, and how long the dates should go on, and the difference between the dates. Since a calendar should have a daily date, we will keep the duration as: #duration(1, 0, 0, 0). But you can change the start date and length of the list as you wish. For mine, I will put start date as #date(2020,1,1) and count 365.
variables
But now we have a problem! Because I put 365 as the count, the list only goes to Jan 1, 2021. I want the calendar to be automatically updated till today. This means, the count (length) has to be calculated and changed daily. We can do that by creating a variable. Let’s make a variable that says, the difference between the start date and today.
Length = Duration.Days(DateTime.Date(DateTime.LocalNow()) – #date(2020,1,1)) +1
Here, #date(2020,1,1) is what I personally put as the start date. This “DateTime.Date(DateTime.LocalNow()” part is for Today’s date. To get the correct length, we need to extract the start date from today’s date and add 1. If not, you will get until yesterday’s date.
So let’s put this together so far. Mine looks like this so far in [Advanced Editor]:
let
Source = List.Dates(#date(2020,1,1), Length, #duration(1, 0, 0, 0)), Length = Duration.Days(DateTime.Date(DateTime.LocalNow())-#date(2020,1,1)) +1
in Source
****Quick side note here about M language for those curious minds:
M language does not go row by row in sequence. This is why you can define the “Length” variable after you already wrote “Source”.
What you write after [in] is what you are bringing in. Think of each line within [let] as a step. Then you call a specific step in [in]. So with the MQuery above, if you write “Length” after [in] instead of “Source”, then you will see the integer (length) instead.
It is working as expected but I personally do not like how I am calling “Start Date” twice in absolute value. If I define it once as a variable, then the code will be easier to read and also when you need to change the start date for a new Power BI report, you only need to update in one spot (less modification steps means less issues!). So let’s define “start date”. I am also going to define “Today” for code cleanliness, but you don’t need to do that. Now this is what I have:
let
Source = List.Dates(StartDate, Length, #duration(1, 0, 0, 0)), StartDate = #date(2020,1,1), Today = DateTime.Date(DateTime.LocalNow()), Length = Duration.Days(Today-StartDate) +1
in Source

Click “Done” to see the result.
Into a table
Awesome — I am happy now with the base. So now let’s turn this into a table so we can add columns and whatnot. To do so, go to List Tools’ Transform tab and click “To Table” (if it looks greyed out for any reason, click the list and it should be clickable).

You will see an option of delimiter and extra columns. Click OK as is.

Now you will see that the list became a table! Let’s change the column name as “date” before we add columns we often use. You can do so by right clicking the column name and clicking “Rename…”

2. Adding Desired Columns
Now that you have a base calendar table set up, you can add whatever columns to this calendar table as you would like, such as Year, month, Quarter, week, or day columns. This is purely based on your preference and what you end up using often. Whichever column you decide to create, you are in luck because Microsoft made this part super easy with a built-in function. Let me show you with “Year” as an example.
Go to “Add Column” tab and click “Date” under “From Date & Time”

In the drop down, look at “Year” and click “Year”. It will automatically add a year column for you. Screenshot:

You can explore the options in the [Add Column] > [Date] drop down and add whatever you would like (note: If it now looks greyed out, click the “date” column again and it should become available). I will add “Start of Month”, “week of year”, and “Name of Day” as an example.

It’s looking good so far! Before we call it finished though, let’s change the format of the date column into date.

3. Saving the code and loading it into a new Power BI Report
Once you have your calendar in a way you like, you can now save the code, and load it whenever you are working on a power bi report!
Save the MQuery code
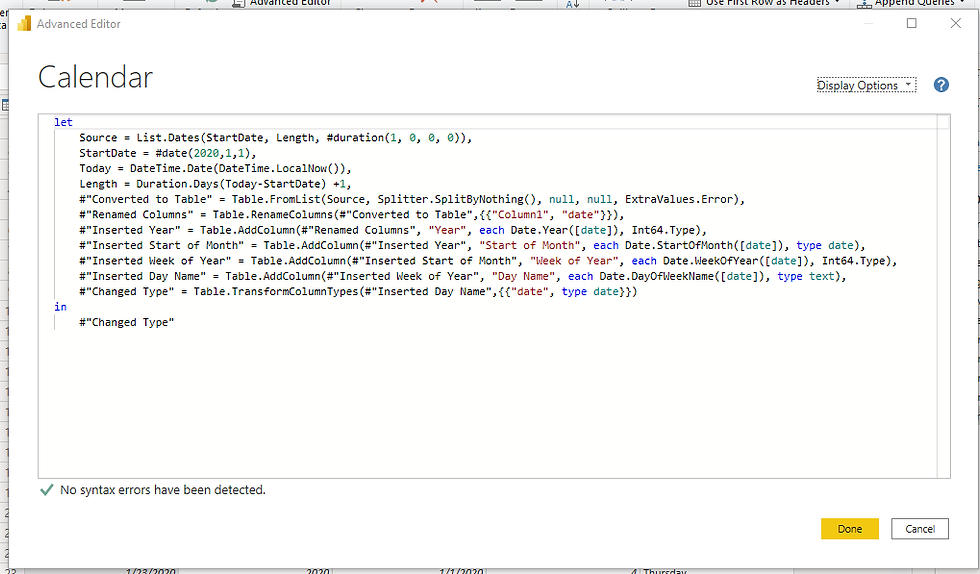
Click [Advanced Editor] and copy the entire code. Save it as a text file somewhere in your computer that you can access easily. Right now my MQuery Calendar code looks like this as I save:
let Source = List.Dates(StartDate, Length, #duration(1, 0, 0, 0)), StartDate = #date(2020,1,1), Today = DateTime.Date(DateTime.LocalNow()), Length = Duration.Days(Today-StartDate) +1, #”Converted to Table” = Table.FromList(Source, Splitter.SplitByNothing(), null, null, ExtraValues.Error), #”Renamed Columns” = Table.RenameColumns(#”Converted to Table”,{{“Column1”, “date”}}), #”Inserted Year” = Table.AddColumn(#”Renamed Columns”, “Year”, each Date.Year([date]), Int64.Type), #”Inserted Start of Month” = Table.AddColumn(#”Inserted Year”, “Start of Month”, each Date.StartOfMonth([date]), type date), #”Inserted Week of Year” = Table.AddColumn(#”Inserted Start of Month”, “Week of Year”, each Date.WeekOfYear([date]), Int64.Type), #”Inserted Day Name” = Table.AddColumn(#”Inserted Week of Year”, “Day Name”, each Date.DayOfWeekName([date]), type text), #”Changed Type” = Table.TransformColumnTypes(#”Inserted Day Name”,{{“date”, type date}}) in #”Changed Type”
Load the calendar

Whenever you need a calendar in Power BI, go to a blank query (Get Data > Blank query) and then open up the [Advanced Editor].

Get rid of what is already in there, and then paste the code you saved earlier (or the code you downloaded online). Change whatever you need to change. For instance, for the calendar we created, I would change the “start date” variable to reflect the start date you want for the new report. Then change the Name of the table into “Calendar” and you are ready to use it in the new Power BI report.
Conclusions
When I began my Power BI journey, I quickly learned the value of the calendar tables. But I put off creating my own M Query Calendar because I was afraid of the M language at that time and I wasn’t sure if it was worth it. But once I spent a little bit of time and created my own calendar in the way I like, it has become an inevitable part of my Power BI development. It has saved me a great deal of time and pain of creating calendars for each report and it has become something like my own signature. Try it out and see how much time and pain it saves you. Start small and build over time. I am certain you will love using your own calendar.
Additional Resources
If you want to learn more about Power Query M formula language, go to microsoft document: https://docs.microsoft.com/en-us/powerquery-m/


Comments